Everything you need to know about adding, editing, customizing voiceovers for your videos in Trainn.
How to Record My Own Voice for Videos?
Akash Anil
Updated on Jun 03, 2025
How to Record My Own Voice for Videos?
Note: Before you create a video in Trainn, you can choose how to create voiceovers. In this guide, we will learn how to record your own voice to add narrations to your videos.
The Use My Voice feature captures your natural voice during screen recording sessions, providing a more personal feel compared to AI-generated narration.
Key Features
Preserves your authentic voice, tone, and speaking style throughout the video
Maintains the natural pacing and emphasis of your explanations
Steps:
Record a Video
Navigate to Create from the top right corner of your library page.
Select Create Video > Record Screen.
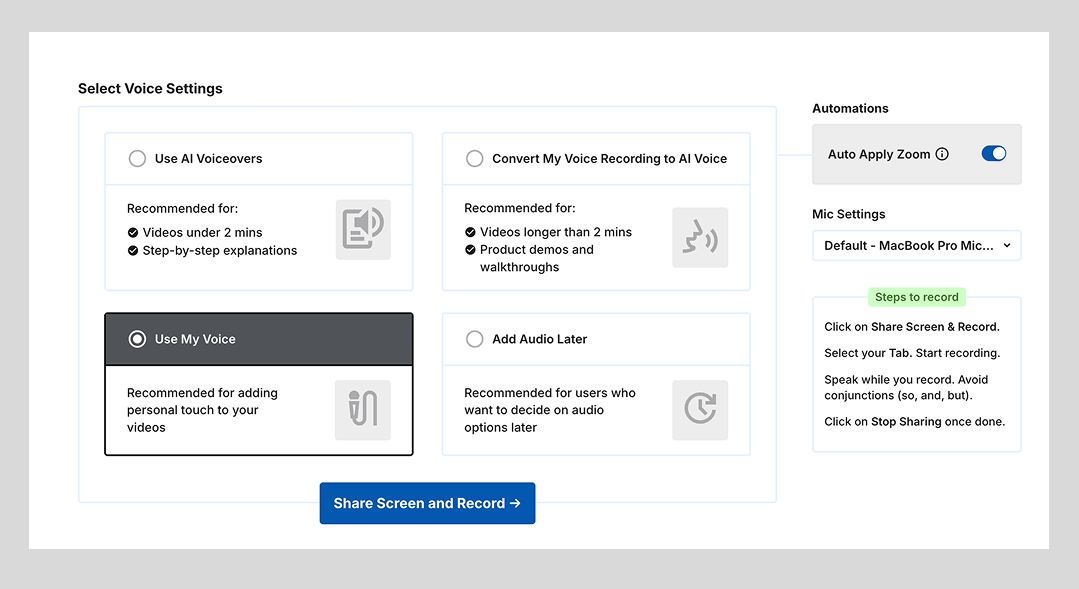
Select Use My Voice under voice settings.

Enable the necessary automation and select an input source to record your narrations.
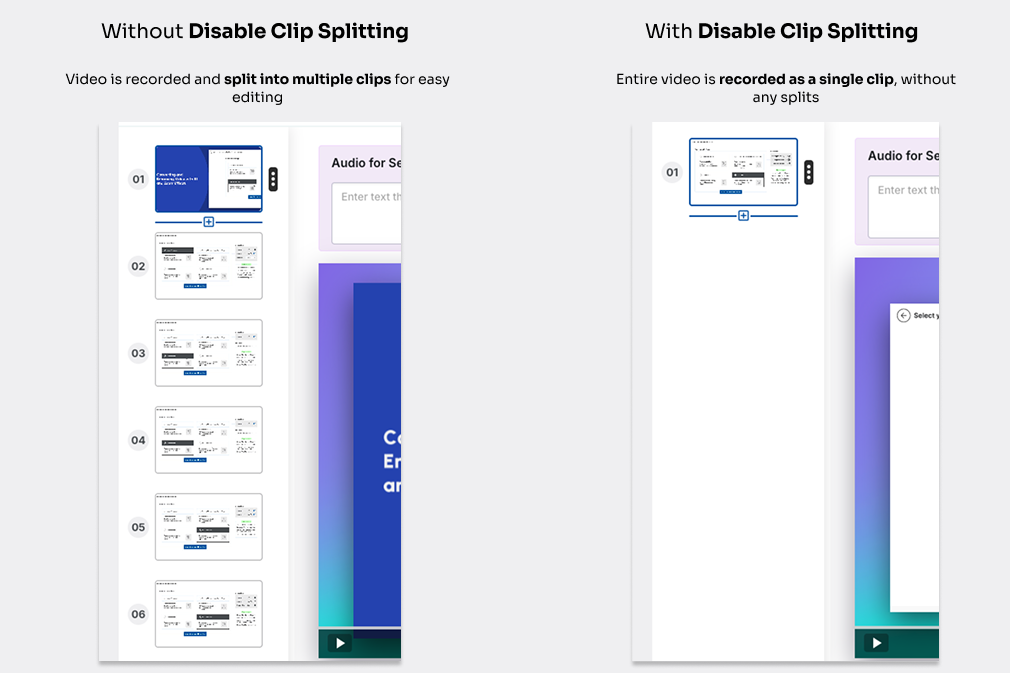
Note: In the Use My Voice option, only Zoom automation is available. if you disable Zooms, you will be given the option to "Disable Clip splitting", use this mode if you do not need Trainn to split the entire video into clips. This way your entire recording remains as one uninterrupted clip rather than being automatically divided into separate clips. Users typically choose this option when they prefer to manually edit and split their content during post-production, giving them complete control over how their final video is structured.

Once you're ready to record your video, select Share Screen and Record.
Select the appropriate Chrome tab to be recorded.
Note: We recommend making all your screen recordings through Chrome tab for perfect video creation, as Trainn is optimized for tab-based recordings. In case you need to record a desktop application, write to us at support@trainn.co and we will enable our desktop client.
Navigate through your product while providing verbal narrations.
Edit the Video
Notice that Trainn marks "Own Voice" in the text to speech editor window. This indicates that voiceovers have been transcribed from your narrations.
Review every clip and the narration tracks.
Note: The transcript generated is for reference only and cannot be edited to change your recorded voice. If needed, click on Re-record to change the recorded voiceovers for specific clips. You can also convert your own narrations into an AI voice by selecting Text-to-Speech from the drop-down menu. This allows you to edit your voiceover scripts as text.
Click Preview & Publish > Publish to finalize your video.
Tips
We recommend using this setting only if you have a good microphone setup, an in-built mic with your laptop, or a sound-proof environment, as any disturbance can affect the quality of instructions and learning outcomes.
Limitations
The text to speech voiceover script generated in Use My Voice mode is only for reference; editing it will not change the voiceover output.
This option requires quality recording equipment and environment for professional results. Ambient noise, echoes, or audio inconsistencies will appear in your final video if not addressed during recording.
When using your natural voice, any speech errors, pauses, or verbal fillers will be preserved in the final recording, potentially requiring re-takes for professional quality.
The Use My Voice feature provides limited post-recording editing capabilities - you cannot substantially modify your spoken content without re-recording.
For global audiences requiring multilingual content, you'll need to manually record separate versions in each target language, as the natural voice option doesn't support automatic translation.

